Detailed installation instructions
If you have any questions or problems, you can ask the folks in our Gitter chat or file an issue on GitHub.
Google Colaboratory
To only run the tutorials, you can use Google Colaboratory. You only need a web browser. No other installation is necessary. Follow the Colab instructions below. A few notes:
- There is a setup that needs to be completed (install brainiak and dependencies, and download data each time you run the tutorials. This can take between 5-15 minutes depending on the size of the dataset you download.
- Google Colab has a session timeout of 12 hours (with browser kept open). After 12 hours, you will need to redo the setup to run a tutorial. If the browser window is closed it will reset in 90 minutes.
- When running tutorials that cover Inter-Subject Correlations and the Shared Response Model (which use the Pieman dataset), you should reduce the number of subjects to 5. This will ensure that the data do not exceed the available memory.
If you want to save your code, you can save a copy of the notebook to Google Drive (accessible from the File menu in Colab).
Instructions
- In Google Chrome go to: https://colab.research.google.com
- In the window click on the Github tab (May need to select File->Open_Notebook for window to appear)
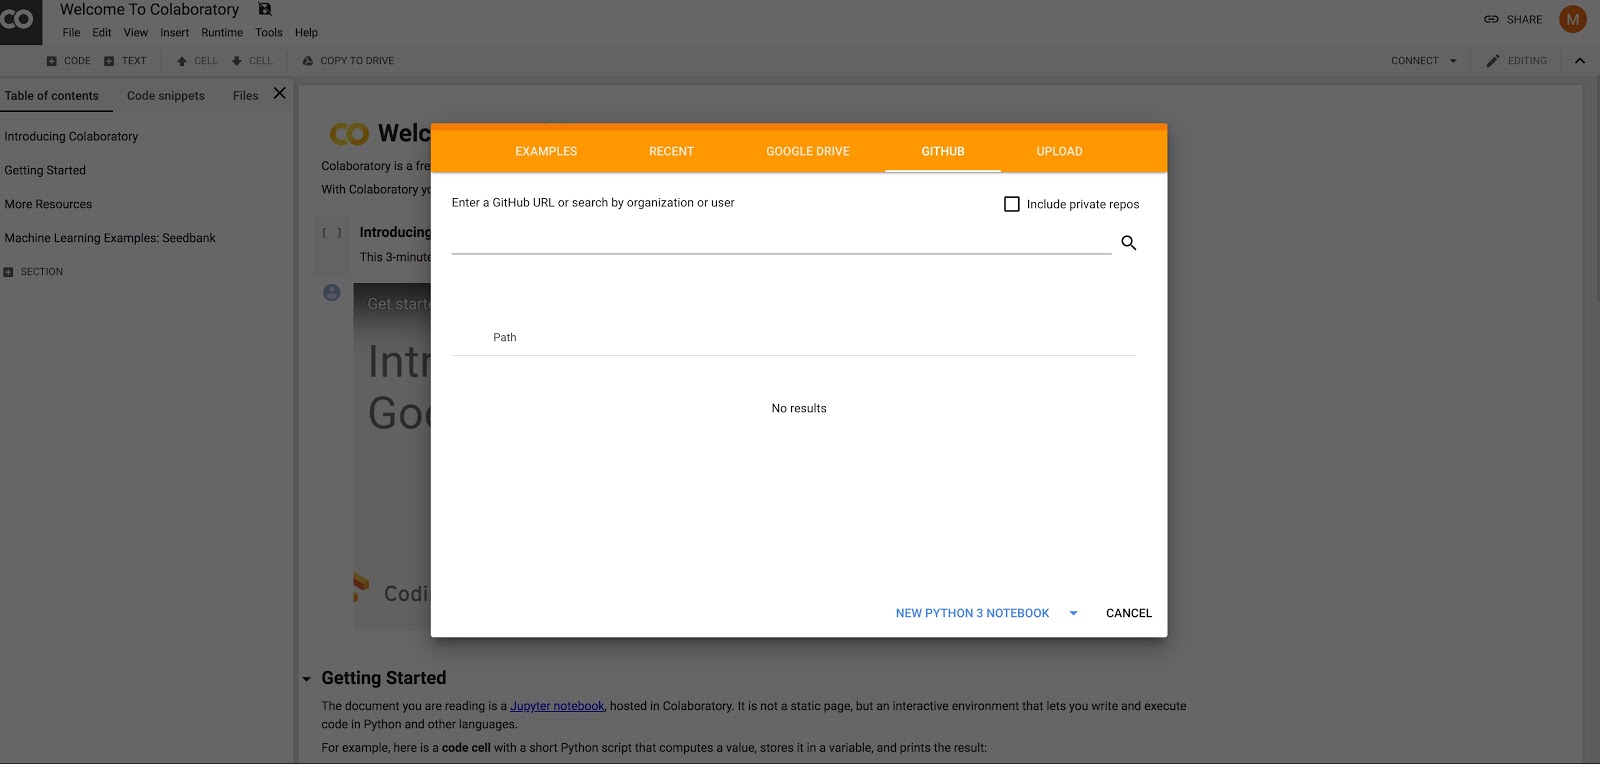
- Enter ‘brainiak tutorials’ in the search box
- Choose branch master (should be already selected by default) and click on the tutorial you would like to run (e.g.,
02-data-handling.ipynb) - In the tutorial notebook menu, click on Insert->Code cell. This will insert a new cell (it may be inserted at the bottom)
- Copy the following code, paste it into the cell just created, and hit
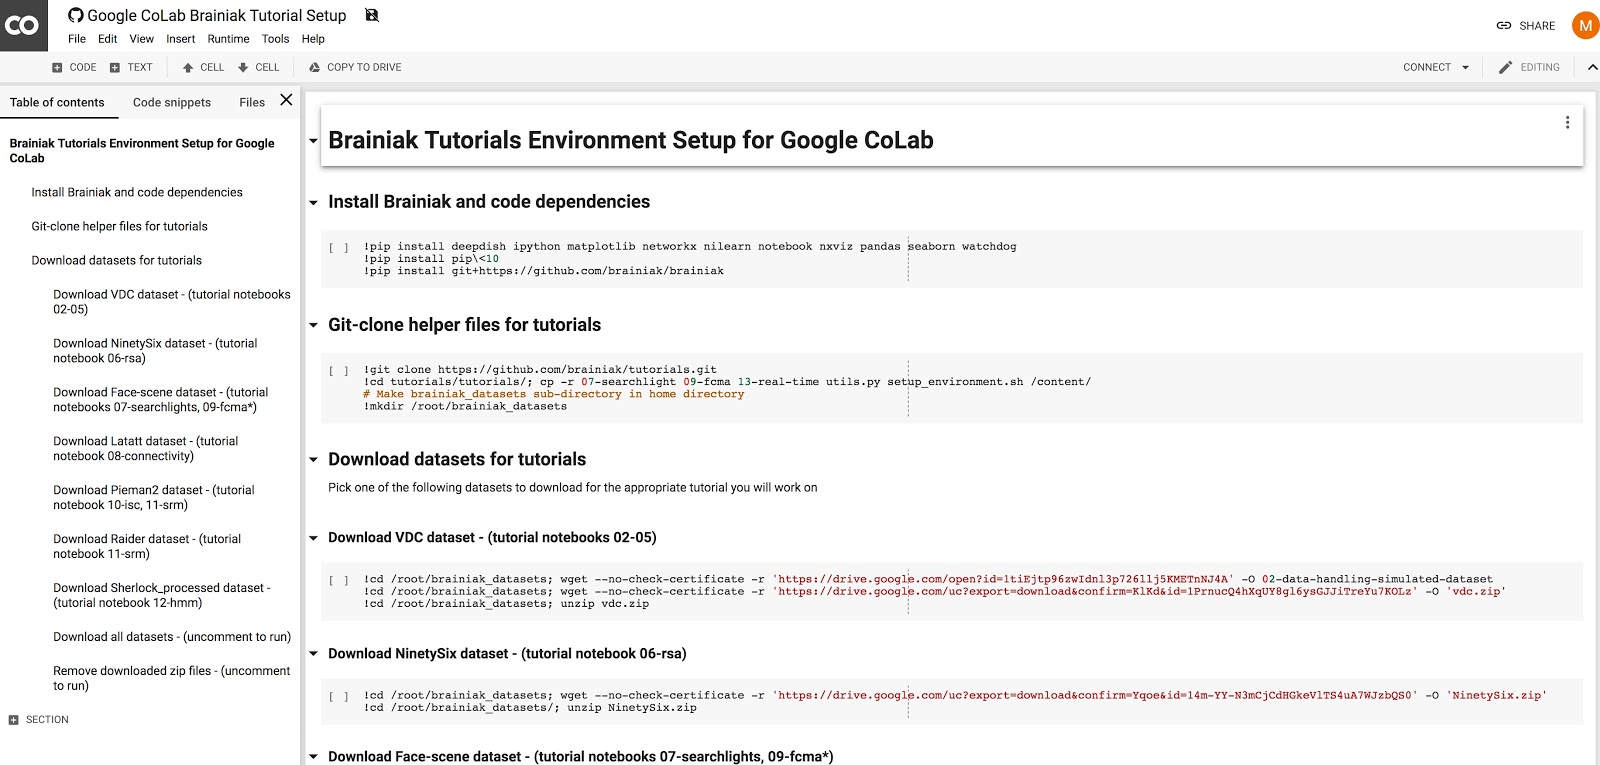
Shift-Enterto run. NOTE: you may need to clickRUN ANYWAYwhen Google Colab presents a warning.!pip install deepdish ipython matplotlib nilearn notebook pandas seaborn watchdog !pip install pip\<10 !pip install -U git+https://github.com/brainiak/brainiak !git clone https://github.com/brainiak/brainiak-tutorials.git !cd brainiak-tutorials/tutorials/; cp -r 07-searchlight 09-fcma 13-real-time utils.py setup_environment.sh /content/ !mkdir /root/brainiak_datasets - To download data for the tutorial, open the following setup notebook: https://colab.research.google.com/github/brainiak/brainiak-tutorials/blob/master/tutorials/colab-env-setup.ipynb
-
Copy the relevant cell in the setup notebook for the data you want to download and paste and run in a new cell in your tutorial notebook: - You don’t need to copy all cells in this section, just the cells for the data you need (e.g. only data for
02if you are running02-data-handling.ipynb). - At this point, both data and software have been set up and you may start the tutorial.
Docker on laptop/desktop (MacOS)
- Install Docker.
-
Resize memory for Docker. click: Docker on Menu Bar -> Preferences -> Advanced
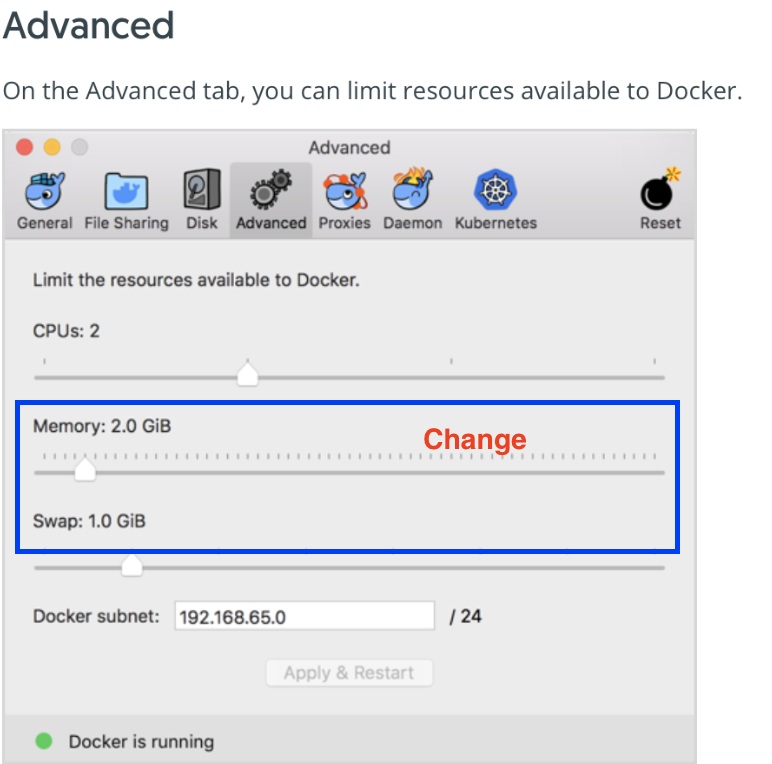
The more memory and swap space you can assign, the better. We have tested with 5GB of memory. The default setting of 2GB is too little to load large datasets. Also, increase the swap space to approximately 4-5GB. If your available space is less than 4GB, set the swap space to whatever you have available.
- Download data for the tutorial
- Create a folder under Downloads:
brainiak_datasets - Unzip the data file and move it to this folder
brainiak_datasets
- Create a folder under Downloads:
- Shutdown all running Jupyter terminals on your machine to avoid port conflicts
- Open Terminal
- Install the BrainIAK Docker by running this command
docker run -it -p 8899:8899 -v ~/Downloads/brainiak_datasets:/root/brainiak_datasets --name tutorials brainiak/tutorials- Installation Completed 😊
Note the port that you need to connect to the browser: 8899
Running Tutorials
- Open a browser on your machine
- Go to http://localhost:8899 (it’s the port after the
-pabove. Ignore any other port info) - You will be prompted for a “Password/Login Token”.
-
Copy the token as shown below

-
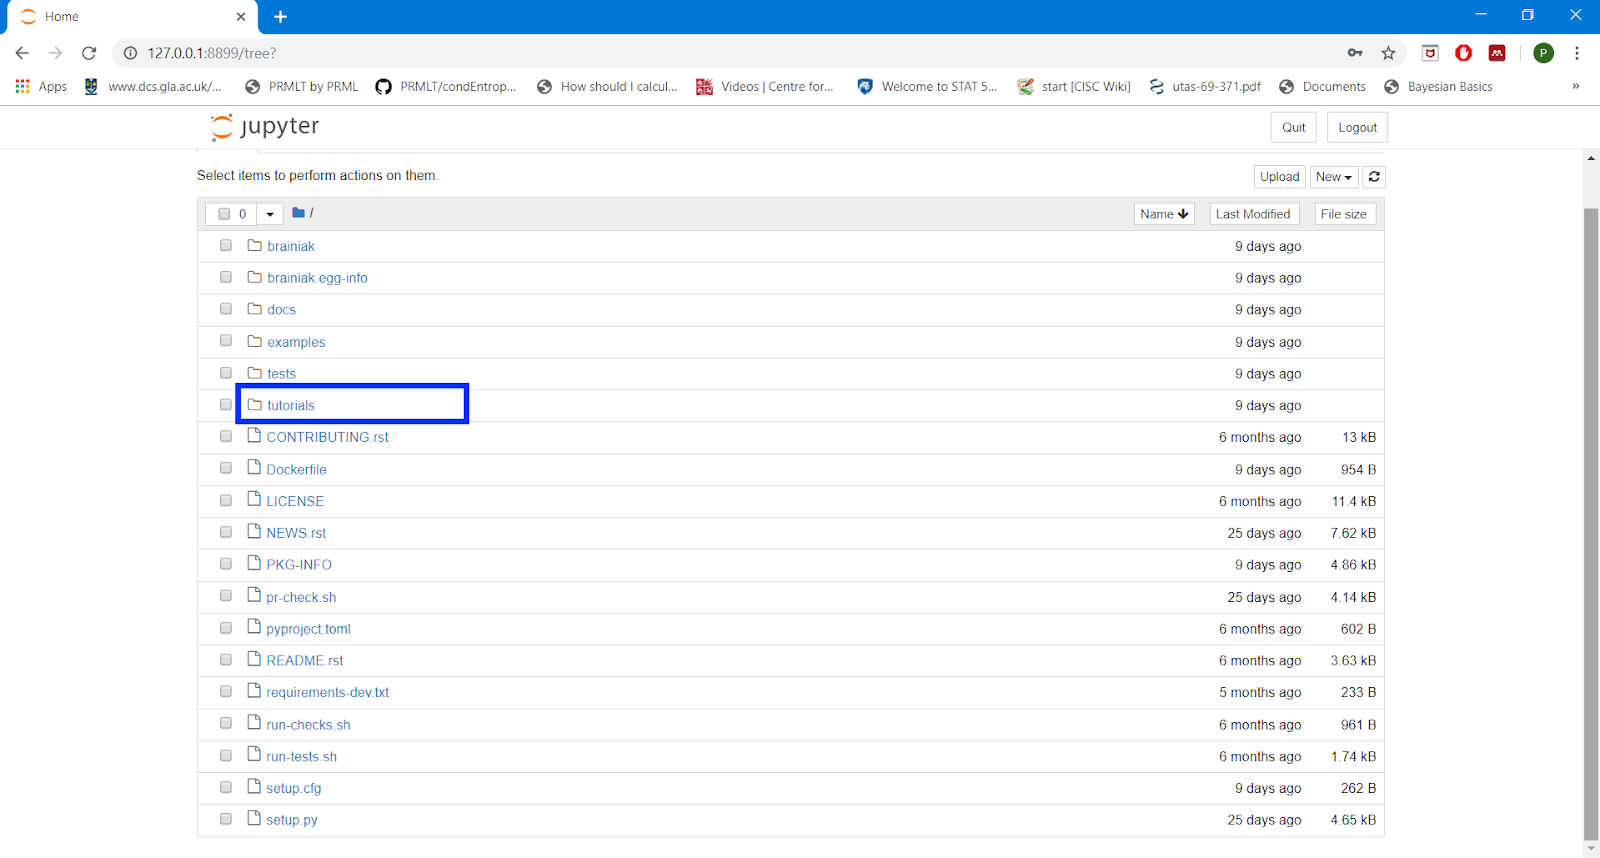
Open tutorials and run.
Docker on laptop (Windows)
- Install Docker using Linux containers
- Resize memory for Docker use. We have tested with 5-7GB of memory on Windows. The default setting of 2GB is too small to load large datasets. Increase the swap space to approximately 4-5GB. If your available space is less than 4GB, set the swap space to whatever you have available.
- Download data for the tutorial
- Unzip data and move it to Downloads/brainiak_datasets
- Share C drive in Docker (instructions here)
-
Run Docker after replacing
USERNAMEwith your Windows user name:docker run -it -p 8899:8899 -v C:/Users/USERNAME/downloads/brainiak_datasets:/root/brainiak_datasets --name tutorials brainiak/tutorials
Running Tutorials
- Open a browser on your machine
- Go to http://localhost:8899 (it’s the port after the
-pabove. Ignore any other port info) - You will be prompted for a “Password/Login Token”.
-
Copy the token as shown below

-
Open tutorials and run.

Conda on laptop (MacOS)
This option is supported for OSX and Linux. For Windows, please use Colab or Docker.
- Check if you have conda installed already. Run
condain your terminal - If you have conda installed, proceed to the next step. Only do these steps if you do not have conda installed.
- Open Terminal
- Install Miniconda with Python 3
- Close this terminal.
- Open a new terminal.
-
Install brainiak-tutorial conda package:
conda create --name mybrainiak python=3.6conda activate mybrainiakorsource activate mybrainiakmv ~/.condarc ~/.condarc.bakconda install -c pni -c defaults -c conda-forge brainiak_tutorials -
In any folder (e.g.,
cd my_code) that you would like to store the tutorials run:git clone https://github.com/brainiak/brainiak-tutorials.git - Download data for the tutorial
- Unzip the data file and move it into this folder
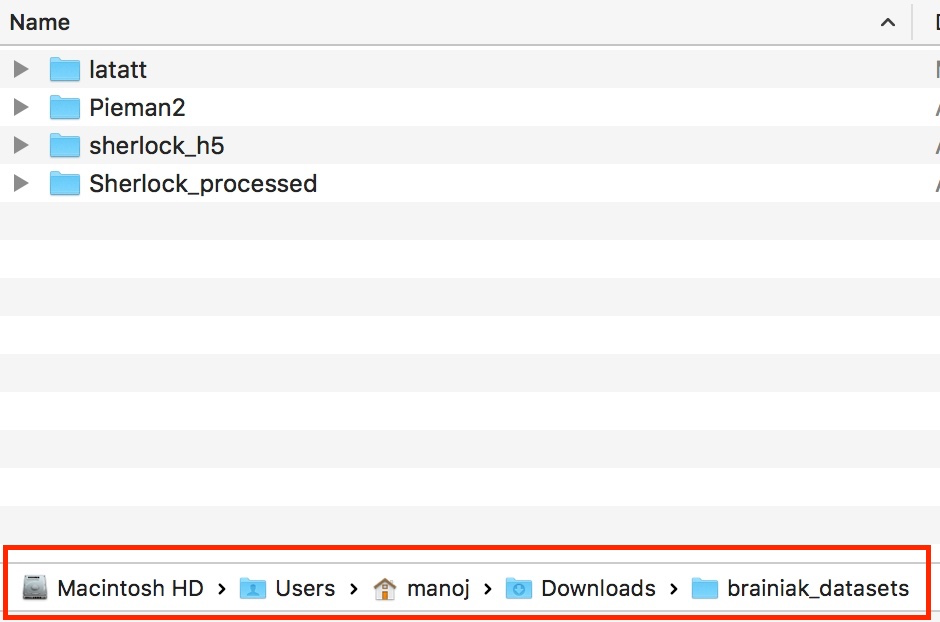
~/Downloads/brainiak_datasets -
The screen shot shows a sample of the data directories for different tutorials
Running Tutorials
- In Terminal,
cd my_code/brainiak_tutorials/tutorials - Check your environment
- Using a text editor, check file
setup_environment.shforCONDA_ENV=mybrainiak - Set
configuration='local'
- Using a text editor, check file
- In Terminal execute:
./run_jupyter.sh - In the browser, you will see a Jupyter window with a list of files
- Open (click)
utils.py - A new tab opens up with this file.
- Update variable
data_pathto~/Downloads/brainiak_datasets/ -
Change
data_path = os.path.join(os.path.expanduser('~'), 'brainiak_datasets')todata_path = os.path.join(os.path.expanduser('~'), 'Downloads', 'brainiak_datasets') - If you move the dataset to any other path, you will need to modify the data_path to reflect the new location of the dataset.
- Go back to the “Home” tab with the list of files
- Open assigned tutorial.
- Execute it.
Conda on server
- Connect to server using Terminal
-
Install Miniconda with Python 3
Example install commands:
wget https://repo.anaconda.com/miniconda/Miniconda3-latest-Linux-x86_64.shbash Miniconda3-latest-Linux-x86_64.shor run the following command to load pre-installed anaconda:
Here is an example:
module load anacondapy/5.3.1 -
Create a Conda environment
conda create -n mybrainiaksource activate mybrainiakorconda activate mybrainiak -
Ensure that your .condarc is not interfering:
mv ~/.condarc ~/.condarc.bak -
Install brainiak-tutorial conda package
conda install -c pni -c defaults -c conda-forge brainiak_tutorials -
Download data for the tutorial
wget --no-check-certificate -r -O 'datasets.zip' 'https://docs.google.com/uc?export=download&id=1ZglrmkYw8isBAfsL53n9JgHEucmrnm4E'unzip datasets.zip - Change data directory path
-
Move data to
~/brainiak_datasets/ -
In the terminal clone the tutorial repo:
git clone https://github.com/brainiak/brainiak-tutorials.git
Running Tutorials
cd brainiak_tutorials/tutorials
- Check your environment
- Check file
setup_environment.shforCONDA_ENV=mybrainiak - Check
configuration='server'
- Check file
-
Launch Jupyter on server (steps and screen shots here for Jupyter on server)
./run_jupyter_remote_server.shEnter token printed by script when asked for token/password on the jupyter web page
Conda on cluster
- Install Miniconda with Python 3
-
Install brainiak-tutorial conda package
conda install -c pni -c defaults -c conda-forge brainiak_tutorials - Download data for the tutorial
- Move data to
~/brainiak_datasets/ - In terminal, clone the tutorial repository
git clone https://github.com/brainiak/brainiak-tutorials.git
- Check directory path in
utils.py- If you change the download location, you will have to update
data_pathinutils.py
- If you change the download location, you will have to update
- Check your environment
- Check file
setup_environment.shforCONDA_ENV=mybrainiak - Set
configuration='cluster'
- Check file
Running Tutorials
- Check your environment
- Check file
setup_environment.shforCONDA_ENV=mybrainiak - Check
configuration='cluster'
- Check file
-
Launch Jupyter on cluster (steps and screen shots here for Jupyter on server)
cd brainiak-tutorials/tutorials./run_jupyter_remote_server.sh(Verify all SLURM parameters for your cluster)
Conda on cluster (admin)
This installation is typically performed by cluster administrators. As a user, you only need to update the modules used, and the path to the data directory. You are expected to have knowledge of SLURM parameters, for your cluster, to launch the Jupyter notebooks and run batch jobs. Your cluster administrator can help you with setting the SLURM parameters.
Administrator tasks
- Open Terminal
- Login to the cluster
-
Install brainiak-tutorial conda package
conda install -c pni -c defaults -c conda-forge brainiak_tutorials -
Download tutorial data brainiak_datasets.zip
wget --no-check-certificate -r -O 'datasets.zip' 'https://docs.google.com/uc?export=download&id=1ZglrmkYw8isBAfsL53n9JgHEucmrnm4E'unzip datasets.zip - Move data to a central location where everyone can access.
- Provide this data path location to all users.
User tasks
- Get directory path to data from administrator.
- Verify SLURM parameters with administrator.
- Open Terminal
- Login to the cluster
- Check access to the repo online:
https://github.com/brainiak/brainiak-tutorials.git -
In the terminal, clone the tutorial repo:
git clone https://github.com/brainiak/brainiak-tutorials.gitcd brainiak-tutorials/tutorials/
Run tutorials
Edit file setup_environment.sh and add the correct module. Your cluster administrator should provide the names of the module(s) (e.g., module load pyger/0.8) to load.
- Comment out
CONDA_NAME=mybrainiak - Set
configuration='cluster’ -
Make the
run_jupyter_remote_server.shscript executablechmod 711 run_jupyter_remote_server.sh - Initiate a remote Jupyter connection to the server - screenshots here: Jupyter on server
- Run the script:
./run_jupyter_remote_server.sh - Open
utils.py - Update
data_pathinutils.pyto the path location of thebrainiak_datasetsfolder. -
You will need to update this line:
data_path = os.path.join(os.path.expanduser('~'), 'brainiak_datasets')with the correct path. - Run tutorials